Sunday, October 21, 2012

Basement Hi-Fi Upgrade

Basement Hi-Fi Upgrade
 
The music at our last Halloween party had a small issue.  The sound of 55 people started drowning out the music.  My system isn't exactly a wimp, but you couldn't hear the music in the back of the basement.  This one doesn't sound too hard to fix.  Time for an upgrade.

Current System:
  • Pioneer Surround Sound Receiver   100 watts x 5
  • Front (A):  Fisher 3 Way Speakers   12" Driver
  • Sub:  JBL 12" with 200 watt amp 
  • Patio (B):  Yamaha Outdoor
  • Center:  JBL
  • Surround:  Polk RC60i (Ceiling Mount)

The basement in the house is roughly 1500 square feet of open space.  The JBL sub can easily overpower a crowd, so we don't need more bass.  If you're close the Fishers, the music is overbearing.  We need to push more highs and mids to the back of the basement.  Adding speakers is the ticket.

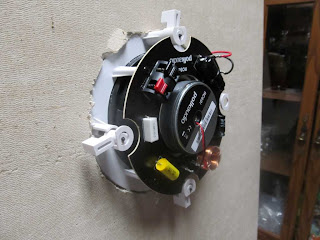
Polk RC60i - In Ceiling Speaker
Crutchfield has an excellent selection of audio and video equipment, so they were naturally my first pick for some in-ceiling speakers.  These Polk's are rated for 100 watts,  mount in the ceiling, and cost about $120.


Use the template and a sharpie to draw the cutout.
Believe it or not, a razor knife does the best job.

The speaker has anchors that clamp
the speaker to the tile.


Mounted in ceiling

A wiring run to the back of the basement needs at least 16 gauge speaker wire.  You start losing sound if you go with small wire for a long distance.  Also make sure the wire you use will fit into the speaker outlets.  I ran the wire up the wall to the ceiling, following the same path as the cable TV coax.

16 Gauge Speaker Wire
About $12

Think it's a good idea to just plug a bunch of speakers into the B channel on your amp?  Nope.  Most amps are made to run speakers at 8 ohms.  When you start hooking up more speakers to the same output, the ohms drop and your amp starts working hard to keep the sound going.  Very similar to hopping on the exercise bike and cranking the resistance all the way up.  You'd wear out quickly and pass out.  If you're lucky, your $400 receiver will burn up.  Unlucky, and it'll catch on fire.

Enter the Monster Cable SS4.  This box supports 4 pairs of speakers and keeps the ohm rating safe for the amplifier.  Amazon.com has these for about $60.  Connect the box to the B speaker outlets on the receiver.

Monster Cable SS4

So now, I've got a new set of speakers in the back of the basement.  The Monster box is driving the Yamaha patio speakers and the new Polks.  What about playing music on the rear surround speakers?  Well, that one took a little thought.  My old school Pioneer receiver doesn't have a setting to change the rear surround speakers to regular music. When you push the surround sound button, movies in Dolby 5.1 come to life, but 2 channel (stereo) audio sounds like crap. 

A little more searching online turned up a speaker selector switch made by Specialty-AV on Amazon.com, roughly $30.  This is a little hard to explain, so you may want to slow down a bit.  The box is really made to hook an amp up to two sets of speakers and select between the speakers.  In my application, the flow is backwards.  The rear surround speakers from the amp go into the "Pair 1" speaker outputs on the box and the "B" speaker outputs from the amp go into the "Pair 2" speaker outputs on the box.  The inputs on the box go to the Monster box inputs.  I use the box to drive all the speakers with either rear surround sound (for movies) or "B" outputs (for music) from the receiver.   

Speaker switcher

Both boxes all hooked up.
Looks a little messy from the back
Label the buttons and the job is finished

This job was actually a lot of fun and only took a couple of hours.  For a bit north of $220, the basement system can safely drive 4 pairs of speakers.  We'll all be smiling at the next Halloween party.

If you're interested here's another article I wrote about hi-def TV's and soundbars:  My not-so-$188 TV

Saturday, September 29, 2012

A House Blog Detour -- The Half Bath Trash Can

A House Blog Detour -- The Half Bath Trash Can


The trash can in my half bath was removed after the events in this post.  Sorry, no metrics on cost savings, time to complete the job, or total bourbons required to figure out what to do.  Time to enter the lighter side of Big B's blog.  This one is for fun.

The story starts at the local piano bar a few years BC (before children).  Our favorite guy is playing tonight.  He looks like a smaller version of Newman, but sounds just like Billy Joel.  We're having a great time with a bunch of friends, but Newman quits playing too early.  No problem.  Time to implement Plan B, which means heading over to Big B's house.  We met some new people on the way out, and in hindsight, inviting them over was not the greatest idea.

The stereo is turned up, a drinks are poured, and a tiny mob enters the living room.  The great time continues for quite some time.  Towards the end of the party, I see water flowing out of the half bath.  Yikes.  People scatter, towels are thrown on the floor, the toilet is shut down, and the guilty party runs for the hills (one of our new friends).  Nothing stops a party faster than a clogged toilet, and the bulk of the mob disappears.  Time to get the plunger.

Let's face it.  The half bath on the main level of your house takes a lot of abuse.  The room is centrally located and very handy.  Heck, the throne in there is fair game for just about anyone who comes over.  This much throughput is likely to cause your half bath to see more than its fair share of traffic jams.

The story gets more interesting the next morning.  Much later the next morning.  I walk into the bathroom to inspect the damage, and notice a familiar aroma.  The place smells bad.  Hmmmm.  I didn't operate the plunger last night.  Maybe the operation failed.  Time to run through the checklist:

  • Ensure water valve is turned on.
  • Raise lid and inspect bowl for any fallout.
  • None found (that's weird).
  • Plunge toilet again several times.
  • Ensure floor is clear of fallout.
  • None found (weirder).
Then, I peer into the trash can.  After yelling a few choice words, my wife shows up. 

Me:  You've got to see this $%&*
Her:  What?
Me:  Look in the trash can.
Her: Oh $@#&


Two turds were neatly wrapped up in toilet paper and then deposited in the trash can.  Since rubber gloves weren't available for use in this project, I only had one question. 

Me:  Why would someone do some crazy )#%^ like that?
Her:  I don't know, but it looks like your @+)% out of luck.
Me:  No way dude, I'm not cleaning up that ^&%*

So I got my &+$# together, went outside, and threw the trash can in the dumpster. Hours later, the odor faded.  The trash can was never replaced.  In fact, the topic was never discussed.

Want a more serious story about toilet repair?  Click here.

Thursday, August 30, 2012

Replacement Window RFP

Replacement Window RFP In our home, you could sit in our dining room and see the front yard without looking through glass.  Yes, our front window had a crack so big between the window and frame that a burglar could get through.  Well, maybe if the burglar was a bug.  Cold dining room in the winter?  Yes, that one was pretty easy to figure out.  I also regularly wondered if the cheap builder-grade windows were rotten under the vinyl wraps.  Nobody in our house was brave enough to check.  My son's room (on the north side) had the draftiest window in the whole house, so we just moved his bed away from the window.

Enter a little luck.  We received a windfall one year, and decided to donate the proceeds to replacement windows.  Hundreds of Google hits guaranteed 20% - 35% savings on heating and cooling costs, and everyone knows that saving energy is a hot topic on this blog.  Time for a replacement window RFP.  We looked through the yellow pages, read reviews on window companies, and posted on Facebook that we were on the hunt for a window contractor. 

Our first interview didn't go well.  The windows looked cool, but the deal was only good while the salesman was inside the house.  We asked him to go outside the house and stay there.  The second interview was from a Facebook referral.  Ends up that he replaced windows in our neighbor's house and also their parent's house.  They were 100% happy with the job, so we invited the guy over.  Jeff instantly turned into one of the coolest contractors we've ever met.  His business is Atlas Window Co, and he showed up with a giant notebook full of before and after pictures and dozens of references.  We settled on a price, and the third interview was cancelled.

Here's what we picked:

  • Alside Windows
  • Two tone vinyl (never needs painting)
  • Double hung
  • Double pane with Argon gas (insulator between glass panes, noise reducer)
  • Low E coating (allows visible light in and reflects light that causes heat)
  • Screens on half of the windows
  • Aluminum wraps around the windows
  • Obscure glass in the bathroom

Jeff followed up with us when the windows arrived at his warehouse and again the night before the installation.  We also received a letter in the mail, showing that our house was added to his insurance policy.  The Atlas Window crew had the new windows installed in less than a day.  They replaced all the rotten wood in the window openings, which ended up being most of the ones that faced west.

These are the ones we could see through the cracks
View from back yard
Study windows
This one was in pretty good shape, so we just had it wrapped.


Bathroom window glass


Obsure glass was installed in both panes in the bathroom. Light comes through, but nobody can see in.  If the sun is out, you can take a shower with all the lights off and see just fine.


Now for the punch line.  Do replacement windows really save money???  The power and gas bills were compared with previous years nicely in Excel.  Do they save 20-35%?  The simple answer is no.  By my calculations, they make less than a 5% difference (roughly $6 a month).  How much were the windows?  A little less than $6,000.  Isn't that like an 80 year return on investment?  83 to be exact.  The math just doesn't work out.  Hmmmm, let's look at the whole thing from a different angle.  If you can hang for a little longer, I'll tell you what we got out of the deal.

  • Many of the windows were rotted after 15 years of the elements, and the windows needed to be replaced anyway. 
  • The house was much quieter instantly.  No kidding.  Road noise, AC compressors, barking dogs, and screaming kids got their volume turned down significantly.
  • More light in the bathroom!
  • More light in the entire house.  The old windows had 100% screens, and half screens let in more light.  The metal structure of the window is also about an inch thinner, so the replacement windows have a wider glass area.
  • No more paying to paint windows, ever.  This job was required every 2-3 years at about $500 a pop.
  • $200 tax credit.  Make sure you read the tax rules and get a window that has a good enough rating for the credit (if the credit is still offered). 
  • In the winter, the house really does feel warmer throughout.  No question that our new windows insulate the house much better, but the thermostat isn't by the window.  It's in the middle of the house.  By the time the cold air got from the old windows to the thermostat, the house was downright freezing by the windows.  Now, the house cools down and heats up more consistently.
SUMMARY

Did our power bills go down?  Yes, about enough to super size an extra value meal.
Should you replace windows to save money on power bills?  No way.
Are we happy?  You bet!

Read this article to find more tips about hiring contractors.
Interested in how to really save some money on electricity bills?  Click here.

Monday, July 2, 2012

Waterfall Repair

Waterfall Repair

I remember working on my Honda Trail 70 as a kid.  SAE tools did an awesome job of stripping all the bolts and nuts on my little metric bike.  Vice grips and a crescent wrench were my most popular tools.  I never got into duct tape much, but maybe we didn't have any.  My spare parts consisted of a box of junk nuts, bolts, and wire that my dad had collected since his childhood.  Don't get me wrong.  I was a lucky kid to have a bike, but I had the wrong tools for the job.  I think my habit of tool throwing started at about this time. 

This latest blog task had the same problem (without the tool throwing).  We were using the wrong parts and didn't even know it.  The story starts something like this:

Hey Honey, the pond is empty again.
"What??!!??!!??"
I'll fill it back up, no problem.

Luckily, I'd made a minor mod the first time it happened.  Rule #1 of fish ponds: put your pump intake high enough in the water that it can pump itself dry, and your fish are still in water.  Our pump is sitting on 2 big rocks about 10 inches from the bottom.  The fish were pretty unhappy when this happened the first time (I didn't know rule #1).  I look out the window most mornings, and I caught the development before all the water was gone.

We worked on the problem several times.  This time, I'm the cheap labor, and my wife is the brains.  When I say "we" worked on it, I just mainly picked up a few rocks, brought beer, and watched the kids.  We were stumped.  We'd make a change, have a nearly empty pond, make a change, have a nearly empty pond, and so on, and so on.  I finally threw in the towel late in the season and unhooked the pump.  They wouldn't have any biological filtration, but that's not a big problem during the winter.

Where do you find the expertise for a job like this?  The pond store of course.  Our local shop, Kentucky Garden and Fountain has been in the business for a long time, and we like them a lot.  They listened to the problem and had the answer in 2 minutes. 

"You guys need a waterfall box."
A what?
"Waterfall box.  It controlls the flow of the waterfall, so your water stays in the pond."

Trumpets sounded, the clouds parted, and we swiped our credit card to the tune of about $200.  We also picked up another liner for the waterfall in case it was leaking, too.  A trip to Lowe's got a a new hose for the pump, fittings for the new box, and a shutoff valve.

Waterfall Box


The waterfall revamp ended up being a pretty big job.  The entire waterfall and stream were yanked out and rebuilt from scratch. 

Teardown


Rebuilding the path


We had to drill a hole in the side of the box and install a fitting for the water hose.  Basically, the box fills up from the bottom and pours out the front in a smooth, controlled fashion.  TIP: make sure that the box is level, so it functions correctly.

Waterfall box placed


Spray adhesive holds the liner to the waterfall box and is used in various places to hold the liner together.

Stones placed, waterfall liner installed


We added a shutoff valve to the water hose, so the waterfall box doesn't drain when we shut off the pump.  The valve is used when we clean the biological filter or do maintenance.

Shutoff valve (red handle) added to water hose


Remember me talking about the home survey on another post in the blog?  While working on the pond, we decided to kill two birds with one stone.  From the survey:  SOIL APPEARS TO BE GRADED ABOVE THE MASONRY FOUNDATION AT THE REAR BASEMENT WINDOW.  THIS CAN ALLOW SOIL MOISTURE TO ACCESS LOWER WOOD WALL COMPONENTS.  We shoveled out the dirt and replaced with pebbles that don't go past the brick foundation of the house (another one crossed off).

See the dirt line on the siding? 


Having the right tools, parts, and expertise made all the difference in this job.  We also make it a point to support our local businesses, so help can be right down the road.  Did I say in this post that I'm lucky to have a wife with this much talent?  I think I just did!

Want to read more about pond?  Click here to see how we overwinter goldfish.
Click here to read about taking care of landscaping lights.

Completed project!!!


Thursday, June 21, 2012

Fishy Business

Fishy Business

In the fishtank world, mine doesn't rank at the top of the list or the bottom.  It's bigger than the typical WalMart model, but not as big as some of the giant fabricated tanks I've seen here and there.  At the pet store, 135 gallons is about as big as you can get, and I've got one in the basement.  I built the stand you see here too, but that's a totally different (and much longer and frustrating) blog entry.  Today I'm talking about how to take care of the fish without taking up all of my time.
The year is 2003, and I'm a newly single guy with a big fishtank that I've never maintained by myself.  I don't want to put my friends on the hook for helping me do this every month, so I've got to come up with something.  Back then, I was more of a margarita man than a bourbon man, so a different recipe was in order.

WFM ingredients
World Famous Margaritas:
12 oz Hose Cuervo Gold
6 oz Grand Marnier (I'm not rich, just did a lot of traveling back then and hit the duty free stores)
6 oz lime juice (Real Lime is the best)
36 oz tap water
1 cup sugar
Instructions: Mix alcohol and lime juice and pour in pitcher.  Put sugar and water in blender for a couple of minutes.  Pour in pitcher.  Serve over ice.  WARNING: THESE ARE STRONGER THAN THEY TASTE.

After a couple of margaritas, I had it all figured out.  Man, this was going to be easy.  Here's what I ended up buying at Lowe's:  garden hose, faucet attachment for garden hose, wood vise, plastic tubing (5/8" ID), small clamp, giant tub (kegger size).

Note the clamp and 20' hose on the siphon
The main issue for a water change is draining and filling 50% of the water from the aquarium for every water change (>50 gallons).  With a lot of big fish, you really need to do this monthly.  The only assembly task I had for the job was removing the 6' tube from the siphon and attaching a 30' hose to the end with a clamp.


Here are the steps I now use to change the tank water:
   Put down towels, take off lights and hoods, power down filtration
   Pop the drain out of the basement shower (I use a small screwdriver)
Siphon hose drains down the basement shower


   Take out rocks/decorations from half of the tank, put in kegger tub (also useful at parties)
   Put plastic tubing from siphon down shower drain
   Siphon out water.  Note: Make sure that the hose stays down the drain or you'll have a big fish poop mess (this really happened one time)
Siphon the water out of the tank


   Put rocks back in.  Sometimes it's good to assemble the rocks in a different way.  The fish think they're in a new place, and they get a little less territorial.
   Clean any other filtration gear you have on the tank.  I have 2 Fluval 404's
   Scrub algae off the tank with a brush.  You can save time by buying a smart plecostomus (one that likes eating algae).  I've had smart and dumb ones, and unfortunately, the only way to gauge intelligence is to dump one in the tank and see if he eats algae off the glass.
   Unscrew the aerator from the sink, and put on the garden hose adapter.  Attach hose.
Garden Hose Attachment for faucet


   Run garden hose from faucet to tank.  Use wood vice to hold hose in tank.  Keep your eyes on this hose, too.  An error can cause a small flood in your basement.
Wood vise holds the hose to the tank


   Mix hot and cold water together to make the new water the same temp as the existing tank water.
   Put chemicals in the tank as the water goes in.  I have 10 gallon tick marks on the side of the tank to make this easy.
Tick marks every 10 gallons on
the right.


   Put hoods and lights back on.  Fire everything back up
This job takes me a bit less than 2 hours every 3 months.  I've also got a few more tips from the guy who's been in the business for 20 years.
   Use good chemicals to treat tap water.  Never skip this step or you'll have dead fish on your hands.  If you can't remember if you treated the water, take the risk of treating it twice.  Amquel and Novaqua are my favorite tank chemicals.  I buy these from http://www.bigalsonline.com/.  I put an extra teaspoon of Amquel (dechlorinator) in just for good measure.  I probably don't need to, but it makes me feel better.
   Never change you tank when the water company is flushing pipes.  The water company flushes out pipes with chemicals about twice a year in my area.  My water smells like chlorine when they do this, but you can also call the water company and ask.
   How often to change?  The more fish you have, the more you need to change water.  Also, the more you feed, the more you need to change.  I feed every other day, and have about 30 tiger barbs in the tank (about 1" each).  You can go all the way up to 2 inches of fish per gallon in the tank if you want to change frequently.  I change water every 3 months, and my tiger barbs are perfectly healthy.
   Over filter.  I have enough biological filtration for roughly twice the size of my tank.  Canisters are much better for the fish than undergravel.  Fluval 404's are my favorite brand, and they do mechanical, biological, and charcoal filtration.
   Prime canister filters.  To prime the Fluvals after cleaning, hold the exit hose out of the water when you fill them with water.  That way, a big air bubble doesn't form.
   Oxygenate water.  Use bubble wands with an air pump to help oxygenate the water.  Bubbles keep the top of the water agitated and allows oxygen to be absorbed into the water.  Bubbles also make your tank look cool.
   No electricity?  Outdoor stores sell an aerator for use with minnow buckets, so your bait will last all day off a D battery.  When we have power outages, I have a BC plan (Business Continuity).  My fish are happy about this one (they've already survived one ice storm this way). 
   Sick fish?  If your fish get sick, have your water tested at the local pet store.  Most of the time, fish get sick because you're not taking care of them.  Yes, I said it's your fault.  The best way to avoid sickness is keeping the level of toxic chemicals in the water down (change water enough) and having enough biological filtration.
   New tank?  On a newly commissioned tank, add fish slowly.  Better yet, start out the nitrogen cycle with some feeder goldfish.  I put about 10 of these guys in a new tank to get it started.  They usually all die before the cycle gets started.  Any survivors can go in your buddy's goldfish pond.
I really enjoy having the fish tank.  With a good maintenance plan, the fish stay happy, and you don't spend all your time keeping them that way.

Read this article to see how our outdoor goldfish make it through the winter.

Monday, May 21, 2012

Crap, It's The Toilet Again

Crap, It's The Toilet Again Thomas Crapper (baptised 28 September 1836; died 27 January 1910) was a plumber who founded Thomas Crapper & Co in London. Contrary to widespread misconceptions, Crapper did not invent the flush toilet. He did, however, do much to increase the popularity of the toilet, and developed some important related inventions, such as the ballcock.  (source: www.wikipedia.org)

I look at the clock.  It's 12:05 AM, and I hear the sound of water running.  I wonder if my son has gotten up in the middle of the night to pee, but then I go back to sleep.  At 3:20, I hear the sound again, and I'm doubting that my son is the cause.  My toilet is leaking.  This goes on for a couple of weeks, and the issue steadily gets worse.  The sound is also waking me up, so I've got to do something about it.

Next comes a trip to my favorite home improvement store.  I stare at the aisle of toilet parts for a few minutes.  Toilets must be big business.  I look at the various kits, but settle on a flapper kit (about $3).  Why replace all the parts when all you need to do is fix the part that's busted?  I might adjust this plan if I just moved into an old house or knew the toilet has not been rebuilt for 10 years or something like that.  I put new kits in all our toilets shortly after we moved in, so I'm pretty sure the rest of the parts are good.  I take the flapper to the leaking toilet and don't even need to take any tools.

Install is easy:
  • Shut off water supply
  • Flush
  • Unclip old flapper, take chain off handle, and remove
  • Clip in new flapper
  • Hook chain on handle (Note: chain should have enough slack to allow the flapper to close completely, but not overly loose)
  • Turn water supply back on
  • Optional: use of the facilities
  • Test flush (if the water stops, you're in good shape)
New Flapper

The whole thing takes 10 minutes, and I'm pouring the bourbon in record time.  Think I'm done?  Nope.  A few nights later, I hear a different toilet run for about 10 seconds and then stop.  Crap...  Am I the only person this happens to?  We have 4 toilets on 3 floors, and I have only repaired one of them.  The next day, I'm at Lowe's buying more parts.  I'm in the toilet aisle for 10 seconds before I come to the conclusion that they have all decided to die at the same time.  I'm not above killing ants with baseball bats, so I purchase 3 more flappers.  I also throw in a handle for the basement unit (action is starting to get sloppy).  Within 20 minutes, all flappers are replaced.  The basement handle is fairly simple to install, and soon it's flushing like it never has before.

Think I'm done?  No, my crappy luck continues for one more stretch.  The kit I installed in the master bath about 2 years ago has a feature to control leaking.  A small arm with a sharp end comes down and locks the float in the up position when it hits the top.  A separate chain pulls the arm up when you hit the flusher.  That way, a leaky flapper doesn't drain your local water tower.  The arm has started sticking at least 50% the time, which results in a very low volume flush.  This isn't good when you have a heavy doody.  I thought the kit had a defective part when I installed it, but I didn't feel like undoing the hour of work I put into the job.  I just fiddled with it until it worked. 

Another run down the toilet aisle at Lowe's, and I've got a new fill valve (about $10). 

I've had good luck with Fluidmaster

Again, install is fairly simple:
   Shut off water supply
   Flush
   Empty toilet (I used a small plastic cup to drain residual water)
   Undo the the nut that holds the feed hose in place
   Undo chains
   Unclip bowl fill hose
   Undo the nut that holds the fill valve in place and remove
   Set height on new fill valve and install seal (this may be a scientific process, but I just set it the same as the last one)
   Install new fill valve with float at 5 o'clock position
   Clip new bowl fill hose on stalk (new one has a water saver feature, but don't have the patience to figure out how to install it)
   Put nuts back on (not too tight, porcelain will crack if you use Incredible Hulk strength)
   Set chains to the same spec as the flapper install
   Turn on water supply
   Make sure tank doesn't leak at the fill valve
   Test flush and leak guard function

 
New Fill Valve.  Note the tension on the chains


Now, she's flushing with authority.  I'd list the TTR (time to repair), but my 4 year old son was helping out with this one.  He easily doubles the TTR, but I truly enjoy having him help.  He learns about how things work, does part of the repair work, and gets tons of praise during the project. 

Summary:
  • You need to think about toilet maintenance about every 5 years
  • Only put in the parts you need
  • If you're thinking about repairing one, think about the rest of them
  • Water leaks usually start slow and get steadily worse
  • If the kit is old or seals look questionable, put in the entire kit
  • This is easy stuff, don't be scared of a toilet rebuild  
Click here for another bathroom article about faucets with scald guard.
Want to read a humorous story about our half bath?  Click here.