Saturday, February 2, 2013

Land Line for 25 bucks a Year

Land Line for $25 a Year?

This story starts with a conversation with myself.

You can't write about this one, Big B.
"Why not?"
The project was too easy.
"But this could save people hundreds of dollars a year."
It won't be very funny.  You didn't even go to Lowe's three times or drink any bourbon.

We had a dilemma.  Our son was born, and we had just worked up the courage to hire a babysitter and head out for a date.  The issue was that our land line was disconnected many years ago due to cheap cell phone plans that include free mobile to mobile and 1400 rollover minutes.  What if something goes wrong and the babysitter's cell phone doesn't work?  We needed a land line, but didn't need the pricetag.

Version 1.0 of this blog story started with the original MagicJack.  Don't get one.  They stink.  The first MagicJack required your PC to be turned on all the time, and the app made your PC boot up so slow that you could brew a pot of coffee before the PC was usable.  To fix this, I wrote a script to deactivate MagicJack from the startup and made sure that the PC was on before the babysitter got there.  Your average Joe doesn't have these kind of skills, and the whole thing was kind of a drag.  Version 2.0 of this product fixes all that.  Mine came straight from www.magicjack.com when they were running a half price sale (about $40).  RadioShack has them for $69.99.

MagicJack Plus doesn't need a computer to run, just to activate.  First, plug the MagicJack Plus into a USB slot on your PC.  Then run through a configuration routine on the PC to get everything ready.  After running setup, the MagicJack plus plugs straight into a router via an ethernet cable.  Plug another cable into power, run a phone line to a regular analog telephone, and you're all ready to go.

MagicJack Plus connections.  Power on the right,
ethernet and phone cord on the left.


Ethernet cable plugs directly into router.
No PC needed for daily use.


MagicJack service runs about $25 per year for unlimited long distance and local calling in the US.  I know people that pay the phone company $50 per month for the same service.  MagicJack offers add on services (like a vanity number) for a fee if you want.  They also sell international calling at more reasonable rates than cell phone providers.  Quality of the service has been very good for the past 6 months, and the international service sounds like you're talking to someone right next door.

You'll also need an analog phone to actually talk on the thing.  For about $40, I got a Uniden cordless model with 3 handsets.  The base and spare phone are in the basement close to the router, and we also have one upstairs.  The Uniden set has voicemail built into the base, but MagicJack service also includes voicemail that gets forwarded to your email address.

Any drawbacks?  Figured you'd ask about that.  First, MagicJack doesn't offer local phone numbers in every town.  I had to pick a local number in a town about 25 miles away.  No biggie, because long distance is pretty much free these days anyway.  The service also isn't as reliable as a land line from the phone company. 

We use a cordless phone to plug into the MagicJack Plus


To summarize, you need these things to run a MagicJack plus:
  • Broadband internet service
  • Free port on your router
  • Analog phone (mine was about $40)
  • MagicJack Plus hardware (about $70)
  • MagicJack service (about $25 per year)

A land line for $25 a year? Absolutely, and you don't need a lot of gear or IT knowledge. 

Want to read an article about lowing your electricity bill, too?  Click here.

Thursday, January 17, 2013

The Coolest Grill

The Coolest Grill
 
One of my friends always has the coolest grill.  He routinely refreshes "the coolest grill" with top of the line Weber products.  Lucky for me, my wife is in the distribution chain of the hand-me-down models, and we received his very first coolest grill.  This model is a vintage Weber Genesis Gold that was purchased some time before I could legally drink bourbon.  Hint: tenure at my current job is 20 years and change.  Why is the grill on the deck instead of the curb?  Read on to find out.

The story starts in 2004 with my wife informing me of the arrival of the coolest grill (note: names have been changed to protect the innocent).

"Take a look at this grill we just got"
Where did that come from?
"Zane just got a new grill and gave his old one to Lonnie.  Lonnie just gave me Zane's old grill from last time."
Looks like a poke o'doody to me.
"Zane always buys really nice stuff.  I bet this grill is a good one."
That grill is older than Methuselah.

My grill was fairly new and working fine, so the coolest grill sat in the back yard for several months.  At my house, things like this usually get thrown away quickly.  However, my relationship would run much smoother if we just kept both grills and put the new junker on the back burner.

Early the next year, an act of vandalism rendered the non-cool grill inoperable, and the unit was sold in a giant yard sale.  On an evening when a steak dinner was planned, I took a look at the coolest grill to see about connecting a propane tank.  Grill technology must change over the years just like IT equipment.  The propane tank wouldn't screw on the regulator.  After a quick trip to Lowe's for a new regulator/hose assembly, the steaks were sizzling.  The Weber held a steady temperature and cooked the steaks evenly.  The steaks were, frankly, the best ones I'd ever cooked!


New regulator and hose for tank


The coolest grill started chugging away.  We were eating some of the best cooked food in the history of our  household, but the grill had some serious issues.  Do you remember me saying something about this grill falling apart?  When a grill starts to die, it's not exactly the end of the world.  The scenario is more like Steve Austin from the Six Million Dollar Man.  "Gentlemen, we can rebuild him. We have the technology."

At first, cooking was fine if you didn't stray from the right side.  One of the burners on the left had a huge hole, which created a small blowtorch soon after the grill was lit.  The real problems began when another hole popped up on the right.  When you get to this point, either you get a newer model or start buying parts.  We didn't want the good food to stop, so I hopped in the car for a trip to Lowe's.  Usually, they've got everything you need at Lowe's, but this time the grill dude had to get on the computer and order me a set.  When he started asking about lengths and model numbers, he got a blank stare.  If you do this, make sure you measure parts, take some pictures on your smartphone, and write down model numbers.  On the second trip to Lowe's, all the questions were answered, parts were ordered, the Chase Visa took a $115 hit.  The coolest grill was down for about a week.

During the repair job, more problems came to the surface.  Lonnie had installed a custom grate (built from the side of an outdoor AC unit) to hold ceramic bricks just above the burners.  The grate had to be removed for the burner replacement.  Let's just say that the grate was in nearly the same shape as the burners.  After the burner replacement, I did my normal Google and bourbon meditation to do a little more research on grilling.  A couple of things came to light.  Number one, the coolest grill needed a new set of flavorizer bars.  These sit right above the burner (protecting them from grease) and more or less keep flames from directly hitting the food.  Number two, www.grillstuff.com is a great place to go for hard to find Weber parts.  They have a great selection of Weber parts and good pricing.  After another wait of about a week, the custom grate came out, the flavorizer bars were installed, and things hummed along for a while ....... well, until we stained the deck.

Flavorizer Bars


The coolest grill despised being moved, period.  Picking the grill up to move it into the yard and then back to the deck caused the legs to come totally apart.  Think something like broken legs stops me?  No way.    For about $20 and 3 hours of labor, brackets were bolted on the legs, and the entire frame got a nice coat of Rust-Oleum paint.  Weber uses some stout steel on the frame, and 2 drill bits broke in half while drilling holes for the brackets  Also, the wood from the grill got pressure washed and treated with the same stain as the deck.

Brackets on legs.  Drilling the
holes was the hard part.


This year, the cooking grid started developing more rust than was easily avoidable.  I have several grilling buddies on Facebook, so a poll was in order to pick the right material for the grids.  The choice was stainless steel, cast iron, and porcelain-enameled coated cast iron.  The last option is nearly maintenance free and has the added benefit of holding in heat, so Grillstuff got the business again.  Here's a neat article that explains the pro's and con's of the different types.


Brand new grill grids


After cooking on the grill for several years, I've got a few tips for the amateur griller:

  1. The round thing with numbers on it, commonly called a thermometer, is a necessary part of grilling.  The temp I use most frequently is 450, which works great for chicken breasts and steaks up to 1" thick.  Let the grill heat up for a good 10 minutes and allow the temperature to stabilize before putting anything on.
  2. Whatever you do, please, please, please don't mash hamburgers when you grill them.  The juice was designed to stay inside the hamburger (makes them juicy) and not catch your backyard on fire from a flaming grill.
  3. Thaw meat and let it warm up at room temperature for 10-20 minutes before grilling.  That way, the food is cooked evenly, rather than burned on the outside and cold on the inside.  If you absolutely must cook food that's a little frozen, cut into smaller pieces before grilling.  The best case scenario is to purchase and cook food on the same day.
  4. Quick recipes have 2 components, oil and spices.  After tip #3, coat your big steak with olive oil on both sides and sprinkle on the spice.  Our favorite is Montreal Steak by McCormick.
  5. If you really want to get fancy with recipes and marinades, pick up a copy of Weber's Big Book of Grilling.  The best book for basic grilling (food times and temperatures) is Weber's Real Grilling.  The "Real Grilling" book has great guidelines for different meats and times for well done, medium, etc.  WARNING: these books can add to your waistline as well as cholesterol level if you're not careful.
  6. If you choose not to read the books and want to slap on some thick BBQ sauce onto your hot dogs, wait until the food is nearly done.  That way you don't have burned sauce on top of raw meat.
  7. Keep the lid down guys!!!  Keeping the lid up lets all the heat get away.  Not even expert grillmasters understand how to cook the good stuff with the grill top open. 
  8. Keeping with #7, try to limit the number of flips.  The pro's will only do 1 flip.  I usually need 2 for steaks and 3 for chicken.
  9. Let your food sit for 5 minutes before eating.  Food will continue to cook while it sits.
  10. Buy some real grill tools for cooking instead of using a puny fork.  The food holds together better, and you don't get burned during a grease flare-up.
  11. A cold beverage always makes the food turn out better.

Now haven't I spent more on parts than a new one would cost?  Sure, but you'll get no argument from me that this grill cooks better and will last longer than anything new on the market.  Maybe even Zane would agree.  Last time he was over, he looked at his old grill and said, "I really liked that old grill.  It was pretty cool."


Wednesday, January 2, 2013

Facts and Myths of HE Washing Machines

Facts and Myths of HE Washing Machines

CLUNK!!!!!  

What in the world just happened in the laundry room?  The washing machine just ended in the middle of the cycle, and my quick diagnosis is that the transmission just took a direct hit from a hand grenade.  The machine is pretty old, so it's time to go shopping.  Little did I know that the world of laundry had changed drastically between 1996 and 2007. 

Last time this happened, the whole ordeal took less than 3 hours.  We just bought a fancier washing machine that had about 16 cycles.  It even had hand wash, which was pretty big stuff back in '96.  The price tag approached $500 for a super nice machine.  Easy-peasy, lemon squeezy as my son would say. 

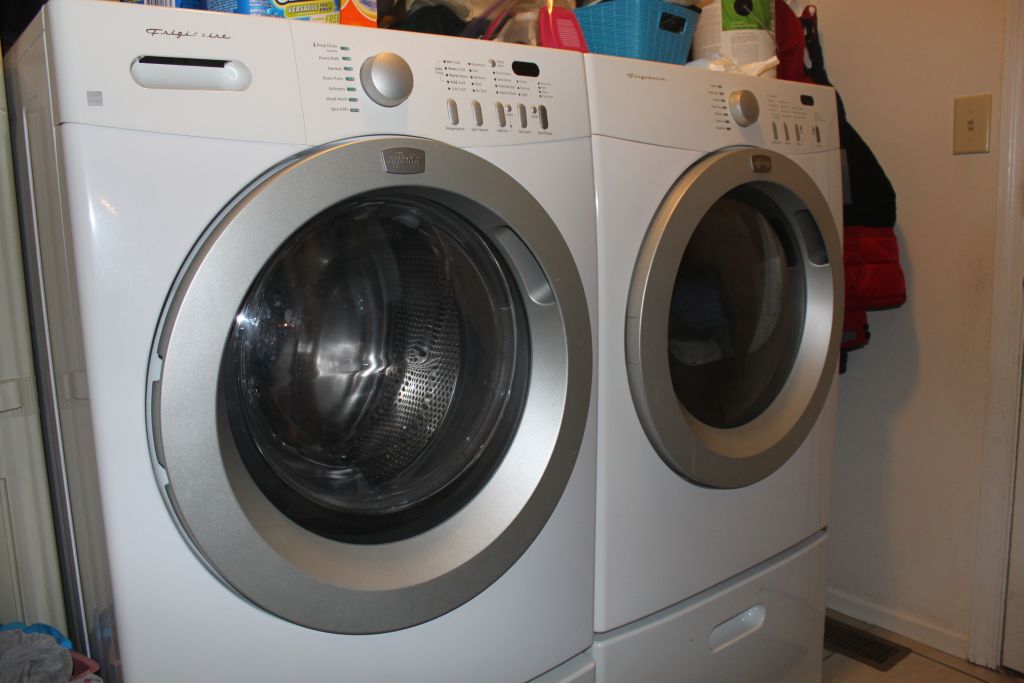
This time, we hit the usual stores and took in all the details.  2007 was fairly early in the days of consumer grade HE frontloading machines, and my head started spinning from all the details.  Sales teams are all well versed in the gospel of HE: less water, less power, and less time doing it!!!  Oh, and spend at least twice as much.  Hmmmmm.  We opted for an offsite meeting at Applebee's to digest all this new info and make a decision.  Happy hour appetizers usually help out with this kind of thing.  Since both of us were pulling down a paycheck (yes, we were DINK's back then) , we decide to spend the bucks and take the HE plunge.  The model we picked was the Frigidaire Affinity series, which a good middle of the road brand.  If you've got more money, step up to a Bosch set.  They actually have suspension built in to make the spin cycle quieter.

After getting to know the new machines and doing research along the way, I've assembled the facts and myths of HE machines.

First the facts.


FACT #1:  Although it may be more aesthetically pleasing, a new dryer is not necessary with a new HE washer.  They don't make HE dryers, but a matching dryer is usually much larger than your run of the mill dryer.  We bought one, because we had the cash and it looked way cooler than my old one.

FACT #2:  A good deal of profit margin is built in, so be prepared to negotiate for the best deal.  We picked a locally owned store that gave us good pricing and some extras. 

FACT #3:  HE washers and dryers are built to sit on pedestals.  Very expensive pedestals (about $200 each).  In theory, you could set them on the floor, but the reality is that you need them.  Otherwise, you're crawling on the floor doing your laundry.  The store threw in one of these for free. 


Pedestals = very expensive storage drawers


FACT #4:  The units use less water.  According to the marketing material, a full load uses about 15 gallons, compared to 40 gallons for a conventional washer.  I had some trouble benchmarking the water usage, because my first son was born at about the same time.  Our water usage didn't seem to go up much, so the washer and baby must have cancelled each other out.

FACT #5: They will save you time and electricity.  IMHO, this is the greatest benefit of all.  The drum on the washer spins water out of the clothing at around 2,000 RPM's.  If you're sitting in our basement, the sound is similar to a helicopter landing on the roof.  Not a good idea to wash clothes while people are trying to sleep, but the clothes really do come out drier than conventional machines.  With the old setup, drying a normal load took at least 1 1/2 hours, and a big load of towels could take longer.  No joke, even  a huge load of towels takes no more than 45 minutes to wash and 50 minutes to dry.  Sound too good to be true?  Believe it.  Our record is 12 loads in a single day.  Since the dryer is a big consumer of electricity and runs about half as much as before, it's a no brainer that you're going to save power.

Now for the myths.


MYTH #1: HE detergent is needed.  Remember the tidbit of using less water?  Less water = less detergent, right?  Imagine my surprise when I found out that HE detergent is the same price for the same amount of loads.  The detergent makers say that HE detergent is specially formulated to clean better with less water and produces less suds.  Some units will even tell you that conventional powders will void your warranty.  WARNING! USE THIS INFORMATION AT YOUR OWN RISK.  What in the heck did laundromats use before HE detergents became available?  I found a post by a laundromat dude with the answer:  "We used less soap".  For a normal load, about 3 tablespoons of conventional powder (Tide Free) does the trick.  You'll need to adjust the amount based on load size, because the washer senses the size of the load and uses less water for a partial load.  A new box of Tide lasts us a long time, and I've been running the same stuff in our HE unit for years.

One time the dishwashing detergent came
with a scoop that was the perfect size!


MYTH #2: HE washers don't clean as well as traditional units.  Our 2 and 5 year old boys test this myth on a weekly basis.  For the little buddy clothing, we add Oxi Clean powder to the detergent tray, select an additional rinse cycle, and treat the tough spots with Oxi Clean spray.  Oxi Clean has powerful enzymes that do a great job of breaking down pretty much anything yucky in the laundry.  Be careful about getting Oxi Clean spray on your fingers.  The enzymes can also start breaking down the skin on your fingers like it did to me one time.  Be careful with the spray and wash hands right after use.  Note: the instructions say to add Oxi Clean powder directly to the drum of the washer, but the clothes seem to do better when adding the powder to the detergent tray.
Oxi Clean spray
takes out the tough
stains.

Oxi Clean Powder - Good Stuff!!


MYTH #3: Fill the scoop up with detergent.  No way!!!  I've noticed that most detergent makers put giant scoops in the box.  More is better right?  No, it just runs out quicker and makes detergent companies richer.  Read the instructions, and draw a line on the scoop with a sharpie.

Stock scoop from the Oxi Clean box.
  Believe it or not,that line I drew at the bottom
is the marker for a full load!


Our Frigidaire units have worked out great, and the best feature is the huge time savings.  If you've got the money to spend, HE is the way to go.


Sunday, October 21, 2012

Basement Hi-Fi Upgrade

Basement Hi-Fi Upgrade
 
The music at our last Halloween party had a small issue.  The sound of 55 people started drowning out the music.  My system isn't exactly a wimp, but you couldn't hear the music in the back of the basement.  This one doesn't sound too hard to fix.  Time for an upgrade.

Current System:
  • Pioneer Surround Sound Receiver   100 watts x 5
  • Front (A):  Fisher 3 Way Speakers   12" Driver
  • Sub:  JBL 12" with 200 watt amp 
  • Patio (B):  Yamaha Outdoor
  • Center:  JBL
  • Surround:  Polk RC60i (Ceiling Mount)

The basement in the house is roughly 1500 square feet of open space.  The JBL sub can easily overpower a crowd, so we don't need more bass.  If you're close the Fishers, the music is overbearing.  We need to push more highs and mids to the back of the basement.  Adding speakers is the ticket.

Polk RC60i - In Ceiling Speaker
Crutchfield has an excellent selection of audio and video equipment, so they were naturally my first pick for some in-ceiling speakers.  These Polk's are rated for 100 watts,  mount in the ceiling, and cost about $120.


Use the template and a sharpie to draw the cutout.
Believe it or not, a razor knife does the best job.

The speaker has anchors that clamp
the speaker to the tile.


Mounted in ceiling

A wiring run to the back of the basement needs at least 16 gauge speaker wire.  You start losing sound if you go with small wire for a long distance.  Also make sure the wire you use will fit into the speaker outlets.  I ran the wire up the wall to the ceiling, following the same path as the cable TV coax.

16 Gauge Speaker Wire
About $12

Think it's a good idea to just plug a bunch of speakers into the B channel on your amp?  Nope.  Most amps are made to run speakers at 8 ohms.  When you start hooking up more speakers to the same output, the ohms drop and your amp starts working hard to keep the sound going.  Very similar to hopping on the exercise bike and cranking the resistance all the way up.  You'd wear out quickly and pass out.  If you're lucky, your $400 receiver will burn up.  Unlucky, and it'll catch on fire.

Enter the Monster Cable SS4.  This box supports 4 pairs of speakers and keeps the ohm rating safe for the amplifier.  Amazon.com has these for about $60.  Connect the box to the B speaker outlets on the receiver.

Monster Cable SS4

So now, I've got a new set of speakers in the back of the basement.  The Monster box is driving the Yamaha patio speakers and the new Polks.  What about playing music on the rear surround speakers?  Well, that one took a little thought.  My old school Pioneer receiver doesn't have a setting to change the rear surround speakers to regular music. When you push the surround sound button, movies in Dolby 5.1 come to life, but 2 channel (stereo) audio sounds like crap. 

A little more searching online turned up a speaker selector switch made by Specialty-AV on Amazon.com, roughly $30.  This is a little hard to explain, so you may want to slow down a bit.  The box is really made to hook an amp up to two sets of speakers and select between the speakers.  In my application, the flow is backwards.  The rear surround speakers from the amp go into the "Pair 1" speaker outputs on the box and the "B" speaker outputs from the amp go into the "Pair 2" speaker outputs on the box.  The inputs on the box go to the Monster box inputs.  I use the box to drive all the speakers with either rear surround sound (for movies) or "B" outputs (for music) from the receiver.   

Speaker switcher

Both boxes all hooked up.
Looks a little messy from the back
Label the buttons and the job is finished

This job was actually a lot of fun and only took a couple of hours.  For a bit north of $220, the basement system can safely drive 4 pairs of speakers.  We'll all be smiling at the next Halloween party.

If you're interested here's another article I wrote about hi-def TV's and soundbars:  My not-so-$188 TV

Saturday, September 29, 2012

A House Blog Detour -- The Half Bath Trash Can

A House Blog Detour -- The Half Bath Trash Can


The trash can in my half bath was removed after the events in this post.  Sorry, no metrics on cost savings, time to complete the job, or total bourbons required to figure out what to do.  Time to enter the lighter side of Big B's blog.  This one is for fun.

The story starts at the local piano bar a few years BC (before children).  Our favorite guy is playing tonight.  He looks like a smaller version of Newman, but sounds just like Billy Joel.  We're having a great time with a bunch of friends, but Newman quits playing too early.  No problem.  Time to implement Plan B, which means heading over to Big B's house.  We met some new people on the way out, and in hindsight, inviting them over was not the greatest idea.

The stereo is turned up, a drinks are poured, and a tiny mob enters the living room.  The great time continues for quite some time.  Towards the end of the party, I see water flowing out of the half bath.  Yikes.  People scatter, towels are thrown on the floor, the toilet is shut down, and the guilty party runs for the hills (one of our new friends).  Nothing stops a party faster than a clogged toilet, and the bulk of the mob disappears.  Time to get the plunger.

Let's face it.  The half bath on the main level of your house takes a lot of abuse.  The room is centrally located and very handy.  Heck, the throne in there is fair game for just about anyone who comes over.  This much throughput is likely to cause your half bath to see more than its fair share of traffic jams.

The story gets more interesting the next morning.  Much later the next morning.  I walk into the bathroom to inspect the damage, and notice a familiar aroma.  The place smells bad.  Hmmmm.  I didn't operate the plunger last night.  Maybe the operation failed.  Time to run through the checklist:

  • Ensure water valve is turned on.
  • Raise lid and inspect bowl for any fallout.
  • None found (that's weird).
  • Plunge toilet again several times.
  • Ensure floor is clear of fallout.
  • None found (weirder).
Then, I peer into the trash can.  After yelling a few choice words, my wife shows up. 

Me:  You've got to see this $%&*
Her:  What?
Me:  Look in the trash can.
Her: Oh $@#&


Two turds were neatly wrapped up in toilet paper and then deposited in the trash can.  Since rubber gloves weren't available for use in this project, I only had one question. 

Me:  Why would someone do some crazy )#%^ like that?
Her:  I don't know, but it looks like your @+)% out of luck.
Me:  No way dude, I'm not cleaning up that ^&%*

So I got my &+$# together, went outside, and threw the trash can in the dumpster. Hours later, the odor faded.  The trash can was never replaced.  In fact, the topic was never discussed.

Want a more serious story about toilet repair?  Click here.

Thursday, August 30, 2012

Replacement Window RFP

Replacement Window RFP In our home, you could sit in our dining room and see the front yard without looking through glass.  Yes, our front window had a crack so big between the window and frame that a burglar could get through.  Well, maybe if the burglar was a bug.  Cold dining room in the winter?  Yes, that one was pretty easy to figure out.  I also regularly wondered if the cheap builder-grade windows were rotten under the vinyl wraps.  Nobody in our house was brave enough to check.  My son's room (on the north side) had the draftiest window in the whole house, so we just moved his bed away from the window.

Enter a little luck.  We received a windfall one year, and decided to donate the proceeds to replacement windows.  Hundreds of Google hits guaranteed 20% - 35% savings on heating and cooling costs, and everyone knows that saving energy is a hot topic on this blog.  Time for a replacement window RFP.  We looked through the yellow pages, read reviews on window companies, and posted on Facebook that we were on the hunt for a window contractor. 

Our first interview didn't go well.  The windows looked cool, but the deal was only good while the salesman was inside the house.  We asked him to go outside the house and stay there.  The second interview was from a Facebook referral.  Ends up that he replaced windows in our neighbor's house and also their parent's house.  They were 100% happy with the job, so we invited the guy over.  Jeff instantly turned into one of the coolest contractors we've ever met.  His business is Atlas Window Co, and he showed up with a giant notebook full of before and after pictures and dozens of references.  We settled on a price, and the third interview was cancelled.

Here's what we picked:

  • Alside Windows
  • Two tone vinyl (never needs painting)
  • Double hung
  • Double pane with Argon gas (insulator between glass panes, noise reducer)
  • Low E coating (allows visible light in and reflects light that causes heat)
  • Screens on half of the windows
  • Aluminum wraps around the windows
  • Obscure glass in the bathroom

Jeff followed up with us when the windows arrived at his warehouse and again the night before the installation.  We also received a letter in the mail, showing that our house was added to his insurance policy.  The Atlas Window crew had the new windows installed in less than a day.  They replaced all the rotten wood in the window openings, which ended up being most of the ones that faced west.

These are the ones we could see through the cracks
View from back yard
Study windows
This one was in pretty good shape, so we just had it wrapped.


Bathroom window glass


Obsure glass was installed in both panes in the bathroom. Light comes through, but nobody can see in.  If the sun is out, you can take a shower with all the lights off and see just fine.


Now for the punch line.  Do replacement windows really save money???  The power and gas bills were compared with previous years nicely in Excel.  Do they save 20-35%?  The simple answer is no.  By my calculations, they make less than a 5% difference (roughly $6 a month).  How much were the windows?  A little less than $6,000.  Isn't that like an 80 year return on investment?  83 to be exact.  The math just doesn't work out.  Hmmmm, let's look at the whole thing from a different angle.  If you can hang for a little longer, I'll tell you what we got out of the deal.

  • Many of the windows were rotted after 15 years of the elements, and the windows needed to be replaced anyway. 
  • The house was much quieter instantly.  No kidding.  Road noise, AC compressors, barking dogs, and screaming kids got their volume turned down significantly.
  • More light in the bathroom!
  • More light in the entire house.  The old windows had 100% screens, and half screens let in more light.  The metal structure of the window is also about an inch thinner, so the replacement windows have a wider glass area.
  • No more paying to paint windows, ever.  This job was required every 2-3 years at about $500 a pop.
  • $200 tax credit.  Make sure you read the tax rules and get a window that has a good enough rating for the credit (if the credit is still offered). 
  • In the winter, the house really does feel warmer throughout.  No question that our new windows insulate the house much better, but the thermostat isn't by the window.  It's in the middle of the house.  By the time the cold air got from the old windows to the thermostat, the house was downright freezing by the windows.  Now, the house cools down and heats up more consistently.
SUMMARY

Did our power bills go down?  Yes, about enough to super size an extra value meal.
Should you replace windows to save money on power bills?  No way.
Are we happy?  You bet!

Read this article to find more tips about hiring contractors.
Interested in how to really save some money on electricity bills?  Click here.

Monday, July 2, 2012

Waterfall Repair

Waterfall Repair

I remember working on my Honda Trail 70 as a kid.  SAE tools did an awesome job of stripping all the bolts and nuts on my little metric bike.  Vice grips and a crescent wrench were my most popular tools.  I never got into duct tape much, but maybe we didn't have any.  My spare parts consisted of a box of junk nuts, bolts, and wire that my dad had collected since his childhood.  Don't get me wrong.  I was a lucky kid to have a bike, but I had the wrong tools for the job.  I think my habit of tool throwing started at about this time. 

This latest blog task had the same problem (without the tool throwing).  We were using the wrong parts and didn't even know it.  The story starts something like this:

Hey Honey, the pond is empty again.
"What??!!??!!??"
I'll fill it back up, no problem.

Luckily, I'd made a minor mod the first time it happened.  Rule #1 of fish ponds: put your pump intake high enough in the water that it can pump itself dry, and your fish are still in water.  Our pump is sitting on 2 big rocks about 10 inches from the bottom.  The fish were pretty unhappy when this happened the first time (I didn't know rule #1).  I look out the window most mornings, and I caught the development before all the water was gone.

We worked on the problem several times.  This time, I'm the cheap labor, and my wife is the brains.  When I say "we" worked on it, I just mainly picked up a few rocks, brought beer, and watched the kids.  We were stumped.  We'd make a change, have a nearly empty pond, make a change, have a nearly empty pond, and so on, and so on.  I finally threw in the towel late in the season and unhooked the pump.  They wouldn't have any biological filtration, but that's not a big problem during the winter.

Where do you find the expertise for a job like this?  The pond store of course.  Our local shop, Kentucky Garden and Fountain has been in the business for a long time, and we like them a lot.  They listened to the problem and had the answer in 2 minutes. 

"You guys need a waterfall box."
A what?
"Waterfall box.  It controlls the flow of the waterfall, so your water stays in the pond."

Trumpets sounded, the clouds parted, and we swiped our credit card to the tune of about $200.  We also picked up another liner for the waterfall in case it was leaking, too.  A trip to Lowe's got a a new hose for the pump, fittings for the new box, and a shutoff valve.

Waterfall Box


The waterfall revamp ended up being a pretty big job.  The entire waterfall and stream were yanked out and rebuilt from scratch. 

Teardown


Rebuilding the path


We had to drill a hole in the side of the box and install a fitting for the water hose.  Basically, the box fills up from the bottom and pours out the front in a smooth, controlled fashion.  TIP: make sure that the box is level, so it functions correctly.

Waterfall box placed


Spray adhesive holds the liner to the waterfall box and is used in various places to hold the liner together.

Stones placed, waterfall liner installed


We added a shutoff valve to the water hose, so the waterfall box doesn't drain when we shut off the pump.  The valve is used when we clean the biological filter or do maintenance.

Shutoff valve (red handle) added to water hose


Remember me talking about the home survey on another post in the blog?  While working on the pond, we decided to kill two birds with one stone.  From the survey:  SOIL APPEARS TO BE GRADED ABOVE THE MASONRY FOUNDATION AT THE REAR BASEMENT WINDOW.  THIS CAN ALLOW SOIL MOISTURE TO ACCESS LOWER WOOD WALL COMPONENTS.  We shoveled out the dirt and replaced with pebbles that don't go past the brick foundation of the house (another one crossed off).

See the dirt line on the siding? 


Having the right tools, parts, and expertise made all the difference in this job.  We also make it a point to support our local businesses, so help can be right down the road.  Did I say in this post that I'm lucky to have a wife with this much talent?  I think I just did!

Want to read more about pond?  Click here to see how we overwinter goldfish.
Click here to read about taking care of landscaping lights.

Completed project!!!